Saturday, September 27, 2008

Save water in your property : The Garden

Here's the first of a few tips on how to save water in your rental property, adapted from a Yarra

Water leaflet, but picking out the highlights relating to renters...
  • If you have grass in your garden then run hosing from the water outlet pipe on your washing machine on to it to maintain a lovely slab of green turf. If you don't have grass, then collect some of the water into a bucket which can easily be used on non-edible plants.
  • Collect rainwater in buckets or tanks for future use.
  • Group plants on their watering needs to make the most efficient use of water.
  • Check the soil before watering, if it's damp already then save that water!
  • Most plants will not need watering as much as you think, try cutting back and keeping an eye on the plant.
  • Pot plants and house plants need a lot of water, do you really need then?
  • Remove weeds from beds, they'll only use up water plants you actually want need.
  • Water plant roots, not onto foliage.
  • Larger plants and long grass can shield smaller plants from the sun.
  • Use water crystals and wetting agents to keep the soil from drying out.
  • Consider laying compost or mulch to keep soil damper.
  • Plant native or drought resistant plants instead of water greedy European varities.
www.savewater.com.au
www.ourwater.vic.gov.au

There is a $30 rebate from your water supplier for products with a value of $100 or more from hardware stores or garden centres.

Sunday, September 14, 2008

Need help with leftovers?

Primarily UK focused, but anyway, if you wan some ideas of what to do with excess food, take a look here :

www.lovefoodhatewaste.com

Wednesday, September 10, 2008

A is for apples!


I've decided to include local fruit in my spring recipes so stay tuned for some lovely fruit and vegetable recipes over spring. It doesn't look particularly spring like here in Melbourne, there are dark clouds and it's been raining earlier. But anyhow....

Many different types of apples are in season at the moment: Jonathan, Golden and Red Delicious, Granny Smith, Fuji, Braeburn, pink lady, sundowner and Lady Williams. But my co-blogger's favourite apple happens to be Braeburn and he was so delighted that it is now available in Australia that I'm dedicating these apple recipes to the Braeburn variety.


Apple Caramel Bars


Ingredients

  • 2 cups flour
  • 2 cups quick oats
  • 1 1/2 cups brown sugar
  • 1 teaspoon baking soda
  • 1 egg
  • 1 1/4 cups butter - cold
  • 1 1/2 cups apple - peeled, chopped

Directions

  • Preheat oven to 350° F.
  • Grease the baking pan with butter or non-stick cooking spray, set aside.
  • In large bowl, combine flour, quick oats, brown sugar, baking soda, and egg. Cut in the butter and mix well until ingredients are crumbly.
  • Remove 1 1/2 cups of the mixture and set aside. Press the crumb mixture into the baking pan, bake for 15 minutes in the oven.
  • While crust is baking, combine caramel topping and 1/4 cup flour in small bowl; mix well.
  • Sprinkle the apples over the baked crust. Drizzle the caramel mixture over the top of the apples. Sprinkle the remaining crumb mixture over the caramel.
  • Place back in the oven for another 20-25 minutes or until the top is golden brown.
  • Let cool completely before serving; approximately 2 hours.
  • Cut into 2" squares and serve.

Baked Stuffed Apples

I'm trying these for breakfast!

Ingredients

1 Braeburn apple

2 g ground cinnamon

1 g ground nutmeg

10 g white sugar

30 g cream cheese

8 g dried cranberries


Directions


1. Preheat the oven to 375 degrees F (190 degrees C).

2. Cut the stem out of the apple and hollow out the center until it is about 1 1/2 inches wide without going through the bottom. In a small cup, stir together the cinnamon, nutmeg and sugar. Set aside half of this mixture, and mix the rest with the cream cheese and dried cranberries.

3. Sprinkle some of the reserved cinnamon sugar into the apple's cavity. Fill with the cream cheese mixture, and sprinkle the remaining cinnamon sugar on the top. Place the apple in a small baking dish.

4. Bake for 35 to 40 minutes, until the apple is tender enough to easily pierce with a fork.

ambiguity is the devil's tetherball...

Recipe: Apple & Cucumber Sammy


1 slice of Bread (Organic White or Wheat)
1 TBSP Cream Cheese
1/2 Braeburn Apple, thinly sliced
1/4 English Cucumber, thinly sliced

Toast your bread, and spread a thin layer of cheese. Cut your slice of bread in half. Cover one half of the slice of bread with apple slices, and the other side with cucumber slices. Assemble sandwich. (Eat any leftover apples and cucumbers, cause they're good for you!)

Tuesday, September 9, 2008

Cycling related links...

Perhaps one of the easiest things to do if you're interested in leading a sustainable existence in rented accommodation is to cycle everywhere!

When you've been doing that for a while, here's two links that may interest :

Ride to work day, Oct 15th
Around the Bay in a Day Challenge, Oct 19th

Monday, September 8, 2008

Make your own Worm Farm

This article had a little bit of guidance from a post found on Sustainability Victoria, which now seems to have disappeared off their website. It's a wok in progress project for us, so we make no guarantee that it will work, but I see no reason it wont. Our aims were to keep it as easy and cheap as possible, so in reach of almost everyone's budgets and limitations.

Worm Farms are great ways of making fertilizer from food scraps in any rental property with a bit of space. You can buy worm farms with everything you need, but they're quite expensive ($100+) and larger, it's not too hard to make your own, here's how!

Find yourself three (in fact two initially, the third is for future expansion) containers, old polystyrene vegetable boxes like the one pictured below are ideal.

We'll start here with two boxes and add a third in the future, so take one box and using a sharp implement (I used a small screwdriver) make some holes in it's base, they don't need to be particularly regular, but you will need a fair few


These holes are for oxygen, but also for the worms urine (which forms one part of the fertilizer) to pass through into the second box below. Ending up with something like this.


Next you need something to cover the bottom of the box, to allow the urine to pass through but so the worms don't fall through, we used several layers of newspaper, which should hopefully work. We also placed a few sheets of dampened paper around the inner edges of the box.


Next we add the worms! When I first started down this path I thought I could go digging in the garden and chuck a few earth worms in a box. Firstly you actually need special worms and secondly you need about 1000 of them to start, so I would have been there for a hell of a long time! This is the singly most expensive part of the process, but 1000 worms cost me $50 and included a healthy amount of dirt for the worms to live in. Carefully pour the worms on top of the news paper and evenly spread them about.


Next add another thin layer of paper on top of the worms, paper is mainly good to balance out the heavy nitrogen content of the food scraps.


Now it's time for the food scraps, again spread them thinly and don't put too much in at once. Ensure everything is nice and moist, when we made our worm farm it was raining, ensuring that everything was sufficiently damp!


Now find a cool and shady spot and something to raise your farm off the ground (perhaps an ever helpful milk crate weighed down with some bricks), place this box (with it's lid) on top of our unmodified box and voila!


Add your food scraps on a regular basis, ensuring that you don't add too much
, keep everything damp and be patient, things wont happen overnight.

We shall return to this topic as we discover more and as our own little farm develops.

TIPS :

What composting worms like to eat
- Plate scrapings (cooked vegetables and stewed fruit leftovers)
- Fruit peelings (not too much orange or lemon peel)
- Vegetable scraps and peelings (not too many onions)
- Hair clippings and vacuum cleaner dust
- Stale biscuits and cakes
- Coffee grounds and tea bags
- Crushed egg shells
- Saw dust
- Soaked cardboard

What composting worms don't like to eat
- Manures
- Acidic foods (onions, citrus, garlic, shallots)
- Garden waste
- Dairy products
- Meat

Sunday, September 7, 2008

Gardening shennanigans!

I bought these little birds at St Andrews Markets the other week:


Here they are protecting the lettuce and silverbeet:


Pretty flowers grown from seed:


Cabbages, garlic, chives and parsley are all going well:


Celery is ready to harvest!


And to celebrate, I'm making celery soup! We have lots of celery so stay tuned for more celery recipes...

Celery Soup Times Ten Recipe
Ingredients
  • 1 bunch celery (including leaves), chopped
  • 1 large sweet onion, chopped
  • 6 cups vegetable or chicken stock or broth
  • 1 potato, peeled and finely shredded
  • 1/2 cup fresh parsley, chopped
  • salt and ground white pepper
  • 1/2 cup whipping cream or half and half

Directions

In large saucepan, saute celery and onion in a small amount of olive oil just until vegetables begin to brown.
  1. Stir in stock or broth. Bring to a boil.
  2. Stir in potato, reduce heat and simmer 30 to 45 minutes.
  3. Cool slightly. Puree in food processor or blender.
  4. Return to saucepan. Season to taste with salt and pepper.
  5. Stir in cream or half and half.
  6. Ladle into bowls to serve hot, garnished with a celery leaf.
  7. Chill if serving cold. Ladle into bowls and garnish with finely chopped celery and leaves for "crunch".
  8. Enjoy!


Tuesday, September 2, 2008

weekly container gardening spotlight!


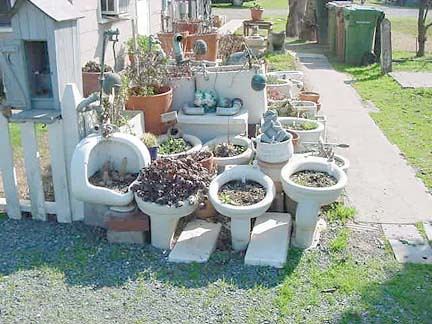
All houses have toilets, but what makes you decide to find a spare one and put it in your garden? If you're looking for some inspiration.....


from here


from here

And for some overkill...

Toilet Bowl Garden by Spittin' Images.

Eeek! But an impressive display of water saving plants.


Monday, September 1, 2008

W is for Watercress!

Today dear readers, is the 2nd day of spring! Woo! Stay tuned for recipes using spring vegetables. I hope you have enjoyed the recipes as much as I have :-)


I've not tried watercress recipes extensively, as I've found it hard to buy, particularly if you don't want to go to big supermarkets. If you can't find it and would like to try these recipes, I'd substitute salad greens of your choice.

Goat's Cheese and Watercress Quiche


FOR THE PASTRY

  • 225g gluten-free flour , plus extra for rolling
  • 100g butter
  • 1 large egg , beaten, plus extra beaten egg for brushing

FOR THE FILLING

  • 1 medium onion , finely chopped
  • 1 tbsp oil
  • 100g watercress , roughly chopped
  • 2 large eggs
  • 150ml milk
  • 150ml log soft rindless goat's cheese , in rough chunks
  • freshly grated nutmeg , optional

Method:

  1. Put the flour and a pinch of salt in a large bowl. Rub in the butter until the mixture looks like breadcrumbs. Stir in the egg and about 1-2 tbsp water to form a soft dough. Knead well then wrap and chill for at least 30 minutes.
  2. Preheat the oven to 200C/gas 6/fan 180C. Knead the pastry again and roll it out to line a 20cm loose-bottomed flan tin (the pastry won't shrink, so no need to chill). Patch holes with spare pastry and brush the base and sides with egg.
  3. For the filling, fry the onion in the oil until just soft, add the watercress and cook until just wilted. Beat the eggs and milk and stir in the watercress mixture and goat's cheese.
  4. Season and if you like, add a pinch of nutmeg. Put the flan tin on a bakingsheet and bake the pastry blind for 5 minutes. Add the filling and bake for 15 minutes. Reduce heat to 180C/gas 4/ fan 160C and cook for 25-30 minutes or until lightly set


Watercress and Pinenut Mayonnaise


Ingredients:

  • 1 bunch of watercress
  • 1 cup of fresh parsley leaves
  • 1/4 cup of cream
  • 2 tbsp of toasted pine nuts
  • 3 tbsp of plain mayonnaise
  • salt and pepper

Method:

Bring a pot of water to a rolling boil. Pick all the leaves from a bunch of watercress. Together with a cup of fresh parsley leaves, throw the watercress in the boiling water for 30 seconds. Drain well and mix the blanched leaves with 1/4 cup of cream. Puree and pass through a sieve.

Place in a saucepan and boil gently until only about 3 tablespoons of green paste is left. Puree 2 tablespoons of toasted pine nuts and add to the paste. Stir in 3 tablespoons plain mayonnaise and season.

T is for turnips!

If the thought of greyish, mushy boiled turnip makes your stomach turn, then read again and see if you can gain a greater appreciation for the tastiness of the humble turnip.


According to wikipedia you might want to consider the swede, (yellow) turnip, swedish a root which originated as a cross between the cabbage and the turnip. Its leaves can also be eaten as a leaf vegetable. It looks like this:
My experience with turnips is most commonly seeing them packaged in a 'soup' vegetable packet at the supermarket containing carrots, turnips, parsnips, onion and celery. I've been determined to find tastier ways to cook and consume...


Turnip and Fennel Flan


Ingredients:
  • 400g white turnips
  • 400g fennel, trimmed weight
  • 1 small onion, peeled and thinly sliced
  • 3 tbsp mascarpone
  • 120g egg whites
  • 2 tbsp rosemary, finely chopped
  • Salt and pepper, to taste
  • 40g butter
  • 100ml extra virgin olive oil
  • 8 baby turnips, very thinly sliced into rounds
  • 2 tomatoes, seeded and diced
  • 6 tbsp chives, finely sliced

Method:

Peel the 400g of turnips and slice into 1/2 cm thick rounds. Trim outer leaves from fennel and cut into 1/2 cm slices.

Bring a pot of salted water to the boil and plunge in turnips, fennel and onion for 3-4 minutes until tender. Drain, cool a little and roughly chop, then mix with mascarpone.

Beat egg whites and rosemary together lightly with a fork and mix with turnips, fennel and onion. Season well with salt and pepper.

Butter six 12cm diameter ramekins and fill with mixture to a depth of 2cm. Bake in a preheated 160C oven for 10 minutes.

Meanwhile, heat olive oil in a frypan and fry baby turnip slices on both sides until golden.

Drain on absorbent paper. Serve flans with turnip slices on top as well as diced tomato and finish with chopped chives.

Serves 6


Turnip and Potato Patties

Ingredients

  • 1/2 pound turnips, peeled and cut into 1/4-inch cubes (about 1 1/3 cups)
  • 6 oz potato, peeled and cut into 1/2-inch cubes (about 1 cup)
  • 2 1/2 Tbsp thinly sliced scallion green
  • 1 egg, beaten lightly
  • 1/4 cup all-purpose flour
  • Grapeseed oil, peanut oil, or canola oil (high smoke point vegetable oils)
  • Salt and pepper

Method

1 In a large saucepan of boiling salted water, cook the turnip and potato cubes for 15 to 17 minutes, until they are tender, and drain them. In a bowl, mash them with a fork and stir in the scallions, the egg, flour, and salt and pepper to taste.

2 Coat the bottom of a large, heavy bottomed skillet with about 1/4-inch of the oil. Heat the pan on medium high heat until the surface of the oil begins to shimmer, but not smoke. Spoon 1/4-cup mounds of the turnip potato batter into the pan, flattening them into 1/2-inch thick patties with the back of a spatula. Fry the patties until they are golden, turning them once, about 4 minutes on each side. Transfer the patties to paper towels to drain off excess oil.

Makes six patties.

Honey-Glazed Rutabaga or Turnip

Doesn't have a picture but it sounds good!

2 lb Rutabaga or turnips

2 tb Butter

1/4 c Liquid honey

1/4 ts Ground ginger

Salt and pepper

Ingredients

Peel rutabaga and cut into 1/2 inch thick slices; halve or quarter slices. In pot of boiling salted water, cook rutabaga for 15 minutes (turnips for 8 minutes) or just until tender; drain.

Stir in butter; cook over high heat, shaking pan often, for 1 minute or until coated. Stir in honey, ginger, and salt and pepper to taste; cook, stirring often, for 1 minute or until glazed. Makes 4 servings